
Vow of the Disciple (V.O.T.D or V.O.W)
|back

Encounter 0.5: Disciple's Pog 
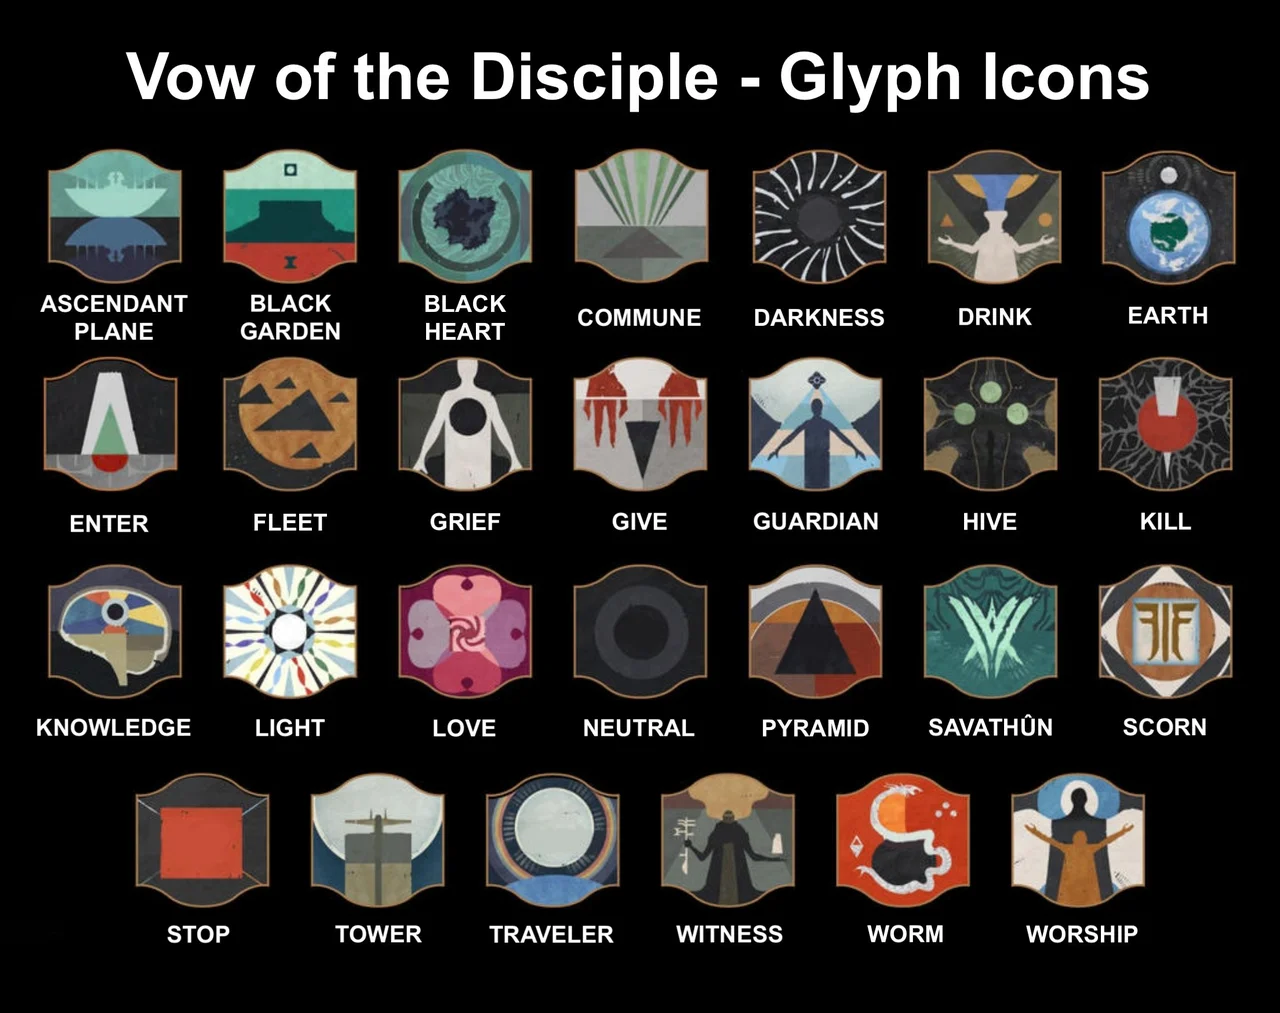
The symbols for this raid can be found here + referenced via the image below in case you don't want to have a separate tab open :)
Before you even get a checkpoint, you've got to escort a payload (think the Throne World public event but with more existential dread) through the bog to the Pyramid entrance. No respawn restrictions here so feel free to mess around with your build!
The important stuff:
- Pervading Darkness is a debuff that will stack up to x10 and kill you, darkening your screen as it goes. Stay near the barge to clear it.
- Kill the Knowledge Bearer Abominations (big yellow bar enemies) and they'll drop orange Knowledge crystals on the ground. Pick them up (stacks up to 3), and deposit them into the barge to move it forward.
- Rinse and repeat until you reach the Pyramid. It's not hard, just don't wander too far from the barge or Pervading Darkness will get you :)
*Note: There are 3 hidden Darkness Spikes to shoot along the payload path that unlock a secret chest. Worth looking up if you're after extra loot runs!
Encounter 1: Day 1 Nightmare
Welcome to the symbol system! This encounter is going to feel overwhelming at first, and then click into place around attempt 3 (For 197th, definitely like wipe 5). Trust the process.

Split into 3 teams of 2, with each pair assigned to one of the 3 Obelisks around the arena. One person defends the obelisk from enemies (if it gets shot too much — team wipe, so stay on it!), and the other is the floater handling the mechanic.
To start, shoot the Door Control crux in the middle of the arena. From here, each obelisk will flash either a Pyramid or Traveler symbol at the top, which tells you which side of the room a Glyphkeeper (a special enemy) will spawn on:
- Pyramid symbol: Glyphkeeper spawns on the LEFT (L1-L5)
- Traveler symbol: Glyphkeeper spawns on the RIGHT (R1-R5)
Kill the Glyphkeeper, note the 2 symbols that appear, and call them out to your team. Each obelisk will produce 2 symbols. Your job is to figure out which symbol appears twice across all 3 obelisks (one will always match). That's the symbol you shoot on the door to progress.
Deposit the symbols correctly, open the door, and repeat until the encounter is done. If the obelisk takes too much damage from enemies? Wipe. WOMP WOMP.
Encounter 2: Day 1 Damage Gate
The Caretaker is this raid's first proper boss, and he is a menace. He doesn't have a traditional health bar to start, instead, you're racing against him as he slowly marches toward an obelisk, and if he reaches it... you guessed it, wipe city.
Split into 2 teams of 3:
- Inside team: heads into the dark room behind the starting door to collect symbols off the walls.
- Outside team: stays with The Caretaker, shoots the glowing weak spots on his back to stun him temporarily, and calls out the 9 symbols on the obelisk that need to be matched.
The inside team reads the symbols off the walls of the dark room and calls them to the outside team. The outside team shoots the matching symbols on the obelisk. 9 total symbols need to be matched to initiate a damage phase, the Caretaker will be stunned, and everyone unloads on his head (literally, shoot his face (pause??)).
Damage Phase
DPS is straightforward. heavy burst supers first (Thundercrash, Blade Barrage etc.), follow up with your heavy of choice. Rinse and repeat this loop across 3 floors, as the encounter moves upward after each successful stun + damage phase.
Final Stand
On the 3rd floor you only get one chance at the damage phase before a wipe. Burn everything you have, before he does.
*Note: The dark room on floor 2 has pits. Don't fall in them btw.
Encounter 2.5: Cayde's Stash 2.0
Nothing mechanically wild here, I don't even know why I put a seperate spot for this
Encounter 3: Amazon for Artifacts
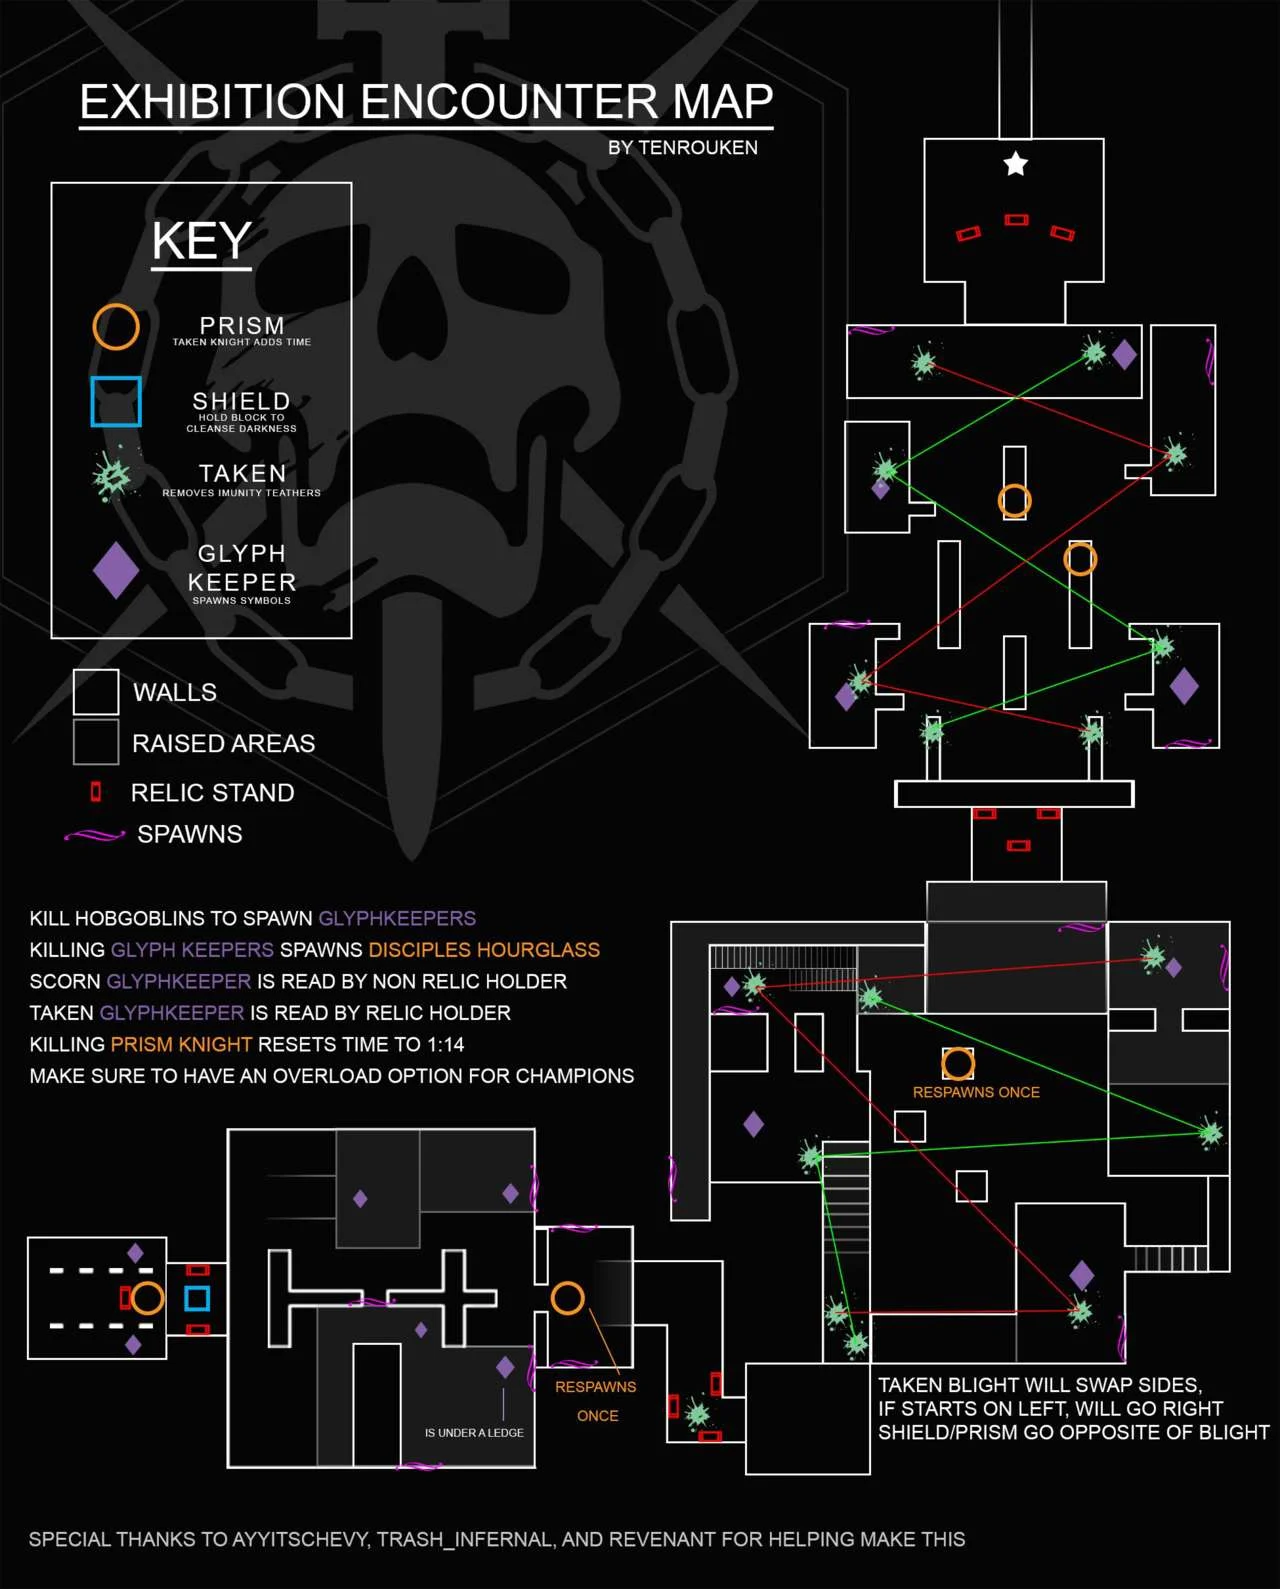
This uses mechanics pulled from Leviathan, Last Wish, and Vault of Glass all mashed together with the VotD symbol system (absolutely horrible design RAD team, oh wait there isn't a RAD team anymore).
The concept: you're moving through a series of rooms, and in each room you need to collect 3 artifacts (relics from those old raids) and carry them to the deposit area at the end, all while a Terminal Resonance timer counts down, hit zero, team wipes. Kill the Disciple's Hourglass enemy in each room to add 40 seconds to the timer, and depositing an artifact also adds 40 seconds each.
In each room, 2 Glyphkeepers will spawn (one Scorn, one Taken). Kill both, note their symbols, same as before, find the matching one and shoot it on the door to open the path forward. The twist here is that whoever is carrying an artifact can see symbols that others cannot, so communication is crucial.
Once the door is open, 3 players carry the artifacts to the deposit room while the other 3 clear adds and do not touch the artifacts (dropping them is very bad). Deposit all 3 and move to the next room. Repeat until you're done!
*Note: There is a Taken Knight that spawns with a shield in each room, kill it to unlock the deposit zone.
Encounter 4: Rhulk, Disciple of Cheese
Remember that time we all finally kicked him in Pantheon 1.0? Me too.

Split into 2 teams of 3:
- Leeching Force team — responsible for shooting Darkness crystals and passing the Leeching Force buff between each other.
- Support team — handles callouts for symbols and clears adds.
To start, approach the orange barrier and Rhulk will begin stacking Pervading Darkness on the whole team, it goes fast, so the Leeching Force team needs to shoot the crystal above Rhulk IMMEDIATELY. Whoever shoots it gets Leeching Force (45 seconds), which allows them to survive Rhulk's laser beam attack. After being hit by the laser, Leeching Force converts to Emanating Force, which can be deposited at the obelisks around the room to push the barrier back.
You need 6 Emanating Force deposits to push the barrier all the way back and enter the damage phase. Each deposit requires: shoot crystal → gain Leeching Force → take Rhulk's laser → gain Emanating Force → deposit at obelisk. Simple in theory, genuinely tense in practice!
IMPORTANT: The number of crystal shots is limited — if you run out before getting 6 deposits, the whole team wipes. Don't waste shots!
Damage Phase
Once the barrier is down, go in and shoot Rhulk's glaive to restart the Leeching Force loop, but now you're actually damaging him. Call out the symbol that appears, get your Emanating Force, deposit it at the correct corner of the room, and dump everything you have into Rhulk. Repeat until he's dead!
Final Stand
When Rhulk hits final stand, Pervading Darkness will start stacking on everyone, you have 3 attempts (roughly) before it hits x10 and kills the team.


Est. June, 2026 | Human Made.